

Walker Windows Knowledge Base
Blog & Industry Insights
Technical installation guides, pre-construction best practices, and commercial window news.
2026 Top Window Mock Up Testing Guide for Global Buyers?
Table of Contents
- Understanding Window Mock-Up Testing and Its Role in Building Projects
- Defining Project Requirements Before Testing Window Mock-Ups
- Selecting Test Methods, Standards, and Performance Criteria
- Assessing Test Results and Identifying Required Design Changes
- Comparing Global Suppliers and Verifying Testing Documentation
- FAQS
- Conclusion
- Related Posts
For global buyers, a window sample can look convincing in a showroom and still behave differently on a real building. Window mock-up testing helps reveal that gap before full production begins. In 2026, buyers need more than attractive finishes: they need evidence that a proposed window system suits the project’s climate, installation details, and performance requirements.
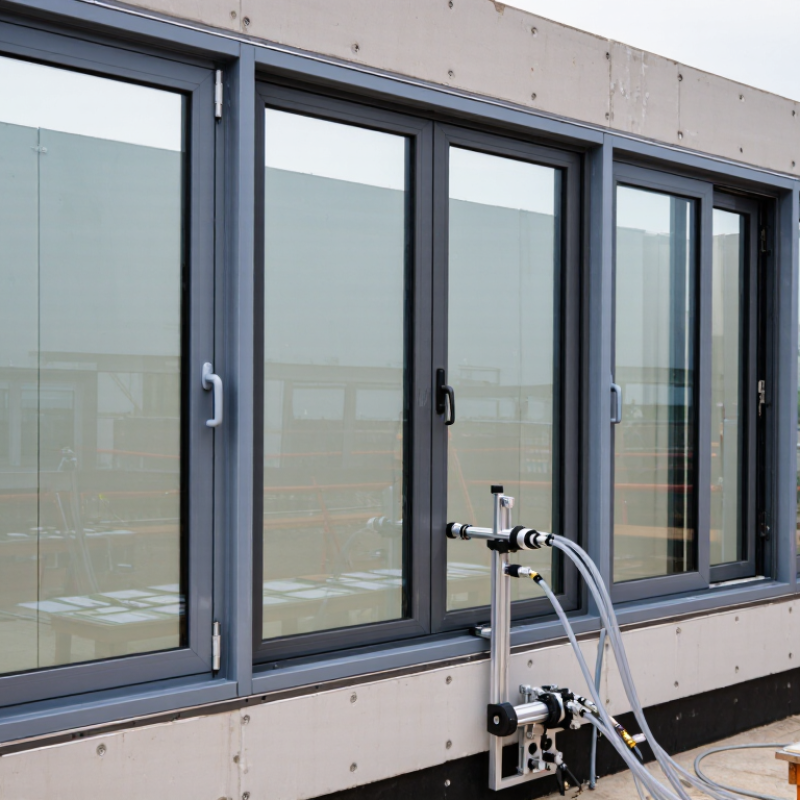
A useful mock-up represents the assembly as it will be built, including frames, glazing, seals, hardware, and connections to the surrounding wall. Testing may examine air leakage, water penetration, structural response, or operation, depending on the project specification. The test setup matters. A poorly detailed perimeter joint can distort results, while a carefully documented specimen makes findings easier to review. Ask who selected the sample, how it was installed, and whether any changes were made after testing.
Details matter. A small corner leak can point to a larger coordination issue. Buyers should compare the test report with approved drawings and confirm that the tested configuration matches the product being quoted. They should also agree on acceptance criteria before testing, rather than debating them afterward. Requirements vary by project and location, so qualified consultants and recognized testing facilities can help interpret results. No single test answers every question. Even a strong report has limits if field workmanship differs from the mock-up. That is easy to overlook. This guide introduces practical steps for planning tests, assessing reports, and discussing corrective actions with suppliers. Some details may still need a second look; careful buyers leave room for that.
Understanding Window Mock-Up Testing and Its Role in Building Projects
A window mock-up is a representative section of a building façade, assembled to show how the proposed window performs within its surrounding wall. It may include glazing, frames, seals, fasteners, insulation, and nearby cladding. The goal is to assess the complete interface, not just the window by itself. Details matter. A small gap at a corner can reveal a problem that drawings may not make obvious.
Depending on project requirements, testing can examine air leakage, water penetration, structural response, operation, and appearance. Water testing, for example, can show where moisture travels around a sill or frame connection. Results help teams refine details before similar assemblies are installed across a larger building.
For global buyers, the test plan should reflect the project’s climate, exposure, and agreed performance criteria. Confirm those criteria with the design and testing teams; expectations can differ between projects.
A mock-up also has limits. It represents selected conditions, so it cannot predict every installation issue or weather event. Sometimes a test exposes a detail that needs another review, rather than an immediate fix. That is useful information, even if it affects the schedule.
Defining Project Requirements Before Testing Window Mock-Ups
Before ordering a window mock-up, define what the project needs to prove. A sample that looks attractive in a showroom may not answer site questions. Record opening sizes, frame depth, glass build-up, finish, hardware, and the intended installation method. Identify who will inspect each item, including the architect, installer, and owner’s representative. Keep drawings and measured dimensions aligned. Small discrepancies matter.
Set acceptance criteria before fabrication, not after the sample arrives. Specify targets for air and water performance, operation, visible finish, and junction details, then state how each will be checked. Note the project’s climate, exposure, and measurement units so overseas teams interpret requirements consistently. A written checklist prevents “looks fine” from replacing evidence. Use a representative wall section with real sill, head, and jamb conditions where possible. Testing an isolated frame can hide installation problems.
Agree on the test sequence, instruments, responsible parties, and records. Photograph sealant joints and hardware settings before and after testing; log temperatures, water application, pressure steps, and adjustments. Define what counts as failure and who may authorize a retest. Leave time for corrections. Mock-ups reveal details, but cannot predict every site condition. We should admit that limitation. A rushed brief can produce a polished sample and weak answers. That deserves a second look before production begins.
Selecting Test Methods, Standards, and Performance Criteria
A useful window mock-up test begins with the project’s exposure, not a generic checklist. Record window size, glazing, frame material, hardware, installation details, and expected wind-driven rain. Then choose methods that match the risk: air leakage, water penetration, structural loading, thermal performance, or sound transmission. Keep installation representative. A carefully sealed laboratory sample may perform differently from a unit installed on a rough opening.
Use recognized test standards appropriate to the destination market, such as relevant ASTM or EN procedures, and confirm the current edition with the testing laboratory. Ask whether the laboratory is accredited for the specific method, not merely accredited in general. Define acceptance criteria before testing: allowable air leakage, water pressure without uncontrolled ingress, and permitted frame or glass deflection. Set limits from project specifications and local exposure conditions; one threshold does not suit every building. Specify pressure sequence, spray rate, duration, and pass-or-fail rules. Small details matter. A missed sealant joint can change the result. Retest after documented corrections, while preserving the original report and setup photographs. Mock-ups are informative, not perfect; site workmanship and weather can still expose weaknesses that controlled testing misses.
Assessing Test Results and Identifying Required Design Changes
A window mock-up is useful only when its test conditions resemble the intended installation. Record the glazing build-up, frame joints, sealant cure, hardware, and mounting details. Photograph each corner before and after testing. Small gaps matter.
Review air leakage, water penetration, operation, and structural deflection against project specifications and applicable test methods. A pass is not universal. The U.S. Department of Energy’s Energy Saver guidance estimates that heat gain and loss through windows account for about 25%–30% of residential heating and cooling energy use. This is a U.S. estimate, not a global performance promise. Compare NFRC-rated U-factor and solar heat gain coefficient values with the project’s climate-specific targets.
If water appears at a sill, trace its first entry point instead of simply adding sealant. Check pressure, drainage paths, corner joints, and installation tolerances. Change one detail at a time, then retest. That takes longer. It produces clearer evidence. A flaw may come from mock-up workmanship rather than the design, so verify the build before revising drawings. Keep failed readings in the record; hiding uncertainty weakens the value of the test.
Comparing Global Suppliers and Verifying Testing Documentation
When comparing global window suppliers, test the complete mock-up, not a catalogue claim. Request matching opening dimensions, frame material, glazing build-up, hardware, and installation details. Small differences can change results. The U.S. Department of Energy’s Energy Saver guidance estimates that windows account for about 25–30% of residential heating and cooling energy use. UNEP and GlobalABC’s 2024 Global Status Report attributes 32% of global energy consumption to buildings and construction. That sector-wide figure is not a window rating, but it makes credible performance evidence worth checking.
Ask for the full laboratory report, not just a pass certificate. Verify the lab’s ISO/IEC 17025 accreditation scope, test method and edition, specimen identification, dimensions, pressure sequence, and calibration dates. Check air leakage, water penetration, and structural performance as separate results. Request photographs and recorded deviations, too. A tidy report is not proof by itself; perhaps that sounds cautious, but sample mismatches are easy to miss.
Compare suppliers in one matrix, using identical performance thresholds and test conditions. Confirm that report drawings match the proposed production unit, including seals and hardware. If a supplier offers results from another market, ask how its test method maps to your project’s requirements; do not assume the labels are interchangeable. Keep one awkward question in view: was the tested mock-up genuinely typical of the units you will receive?
FAQS
It is a representative façade section with windows, seals, fasteners, insulation, and nearby cladding. Details matter.
Testing can assess air leakage, water penetration, structural response, operation, and appearance. A wet sill may reveal hidden leaks.
Record opening sizes, frame depth, glazing, finish, hardware, and installation method. Align drawings with measured dimensions.
Clear targets make results easier to judge. “Looks fine” is not evidence.
Real sill, head, and jamb details can expose installation issues. An isolated frame may hide them.
Photograph joints and hardware before and after tests. Log temperatures, water application, pressure steps, and adjustments.
Review the test method, specimen dimensions, pressure sequence, calibration dates, and laboratory accreditation scope. Check each performance result separately.
Use matching dimensions, materials, hardware, test conditions, and performance thresholds. Small differences can change results.
No. It represents selected conditions, not every installation or weather event. We may still miss something.
Conclusion
Window mock-up testing helps project teams evaluate how a proposed window system performs before it is used across a building. By testing a representative installation, buyers and designers can assess factors such as air and water resistance, structural performance, operation, and compatibility with the surrounding façade. Clear project requirements should be established first, including expected conditions, performance goals, installation details, and the intended scope of the test.
The testing plan should identify suitable methods, standards, and acceptance criteria for the project, then document how results will be reviewed. If a mock-up does not meet the agreed targets, the findings can guide practical design or installation changes and help determine whether retesting is needed. For global projects, buyers should also compare suppliers on technical capability, communication, and the completeness and traceability of their testing documentation, making it easier to assess proposals consistently and reduce uncertainty before construction.

Blog Tags: