

Walker Windows Knowledge Base

Blog & Industry Insights

Technical installation guides, pre-construction best practices, and commercial window news.

0%

Buying recessed windows from China involves more than choosing a frame style. The window sits deeper within the wall opening, creating a defined reveal that can shape both the façade and the room’s natural light. Small details matter. Wall depth, frame dimensions, insulation, drainage, and flashing all affect how the finished assembly performs. Recessed window installation should therefore be planned around the building design, not treated as a final decorative step.

Before requesting prices, buyers can prepare accurate opening measurements and share wall-section drawings with suppliers. Ask for product specifications, installation details, material options, and relevant test documentation. Compare how each supplier explains water management, thermal performance, and the connection between the frame and surrounding wall. Clear answers are useful; vague promises are not. A qualified local installer should review the proposed details before production, since site conditions can differ from drawings. This step may seem slow, but it can prevent costly adjustments later.

This guide outlines the main decisions involved in sourcing and installing recessed windows, from comparing manufacturers to coordinating delivery and site work. It also highlights questions buyers can use when assessing experience, quality controls, and technical support. Requesting a sample or a project reference may help, though neither replaces a careful specification review. Some details will still need revisiting once the actual opening is measured. That is worth admitting. A dependable result comes from matching verified product information with realistic site preparation and skilled installation.
China Top Guide to Recessed Window Installation for Buyers

Understanding Recessed Windows and Their Uses in China

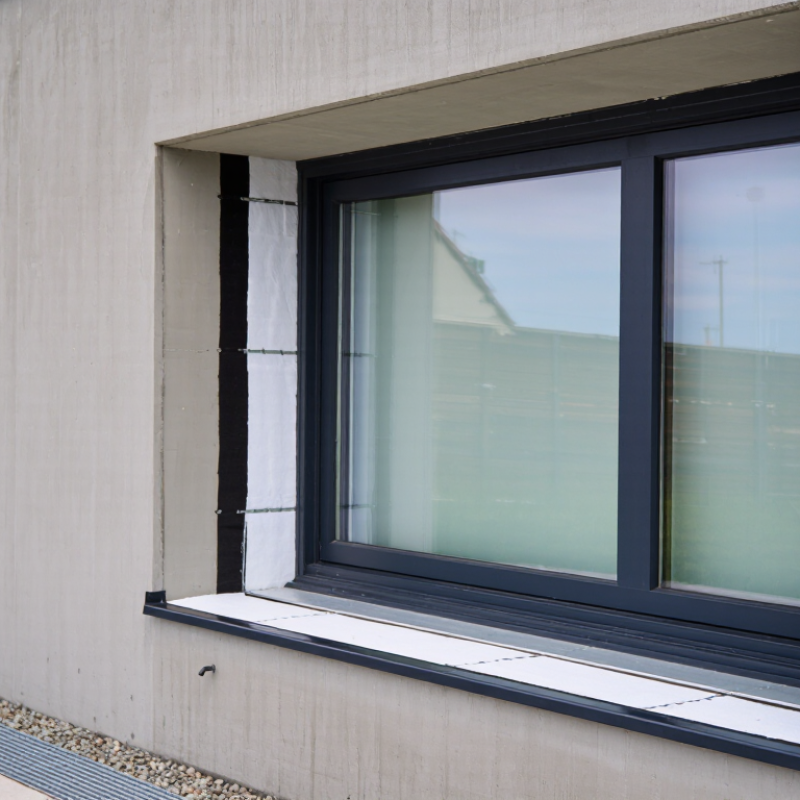
In China, a recessed window sits behind the outer face of the wall rather than flush with it. The surrounding reveal creates a sheltered edge and gives the façade visible depth. This differs from a projecting bay window. The recess may be shallow in a high-rise apartment or deeper in a courtyard house. It can soften strong sunlight, offer partial protection from rain, and create a ledge for plants or a seat. Small details matter. In southern cities, humid air and driving rain make drainage and durable seals important. In northern regions, insulation and airtight joints deserve closer attention during cold, windy months.

Buyers should look beyond appearance. Ask how the frame connects to the wall, where water drains, and whether the sill slopes outward.

A deep reveal can reduce daylight, especially in compact rooms facing narrow streets or nearby buildings. Check the opening at different times of day; a bright showroom may not reflect the apartment’s actual exposure. There is no perfect rule here. Recessed designs do not automatically improve energy performance; glass, frame, installation quality, and shading all matter. In older buildings, uneven masonry can complicate fitting, so confirm measurements on site before fabrication. Interior finishes can hide gaps, but they cannot correct poor waterproofing. This detail is easy to underestimate.

Choosing Recessed Window Types, Materials, and Suppliers

For recessed window projects, choose the installation detail before choosing the frame. A deep reveal can shade glass and create a clean interior ledge, but it also limits daylight and complicates flashing. Compare fixed, casement, and sliding units against room use, opening access, and wall depth. The U.S. Department of Energy’s Energy Saver guidance estimates that windows account for 25–30% of residential heating and cooling energy use. That makes verified performance more than a catalog detail.

Frame material affects upkeep and thermal performance. Vinyl needs little painting; fiberglass is dimensionally stable; wood offers a warm interior finish but needs regular care. Aluminum is strong, though its thermal break matters in cold or hot climates. Ask suppliers for NFRC-rated U-factor and solar heat gain coefficient data, plus installation details for the wall assembly. Compare matching sizes and glazing options. A low rating alone does not guarantee a good result. I would also check local installer references; paperwork can look perfect, while a poorly sealed sill still leaks.

Tips: Confirm the recess depth on site, then mark the sill, head, and jamb clearances. Request a section drawing and written flashing sequence. Keep one detail imperfect on paper, if needed—but resolve it before ordering.

Measuring the Opening and Preparing the Installation Site

Before ordering a recessed window, measure the rough opening, not just the visible frame. Record the width at the top, center, and bottom, then use the narrowest measurement as a reference. Do the same for height, measuring at both sides and the center. Check the opening’s diagonals; noticeably different lengths can indicate a racked frame. Allowances vary by window design, so confirm the required clearance in the installation instructions before buying.

Measure the wall depth from the interior surface to the exterior finish. This helps determine how the frame will sit within the wall and how much reveal will remain. Look for uneven plaster, loose masonry, soft timber, or water marks around the opening. A dry surface can still hide past moisture damage. Remove trim carefully and inspect the edges; rushing this step can leave useful clues covered up.

Clear furniture and protect nearby floors before work begins. Keep the opening accessible, and have suitable coverings ready if rain is possible. Remove loose debris, but do not cut or alter structural members without qualified guidance. Take photos and note each measurement, including where it was taken. It sounds fussy. It prevents confusion later. Even careful measuring is imperfect, so recheck the figures before placing an order.

Installing a Recessed Window Step by Step

China Top Guide to Recessed Window Installation for Buyers

Installing a Recessed Window Step by Step

Start by checking the wall structure, opening dimensions, and window’s installation instructions. Remove loose material, then inspect the sill for rot or uneven spots. A solid, level base matters. Dry-fit the unit before applying sealant; this simple check can reveal clearance problems early. Keep the window supported while you work, and avoid forcing it into a tight opening.

Set the frame into place and use shims to make it level, square, and plumb. Check both diagonals; they should be close in length. Fasten the frame as specified for that window and wall type. Add suitable flashing around the opening, then seal the interior gap with a compatible material. Too much expanding foam can bow a frame. After installation, open and close the sash several times and check for sticking or uneven gaps. Details vary, so an experienced installer should assess uncertain structural conditions.

Tips: Wear eye protection, keep water out during installation, and recheck alignment after fastening. I would not rush the sealing step; it is easy to miss a small gap behind trim.

China Top Guide to Recessed Window Installation for Buyers - Installing a Recessed Window Step by Step

Step Installation Task What to Do Typical Time* Key Checks
1 Confirm the design and site conditions Verify that the recessed position, wall construction, window type, and installation details are suitable for the project. Check applicable local building requirements and the window manufacturer’s instructions before work begins. 30–60 minutes Confirm the wall can accommodate the planned recess and that the window’s drainage and operating features will remain unobstructed.
2 Measure the opening Measure the width and height at multiple points. Check the diagonals and inspect the sill and jambs. Use the window supplier’s specified rough-opening dimensions rather than assuming one standard clearance. 20–40 minutes Record the smallest measurements; check that the opening is square, structurally sound, and large enough for the specified installation gap.
3 Prepare the opening Remove debris and loose material. Repair damaged framing or masonry as needed, and prepare the sill and surrounding surfaces for the required flashing and air-sealing materials. 30–90 minutes Do not cover rot, cracks, or water damage. Any structural repairs should be completed before the window is installed.
4 Install sill and opening flashing Apply compatible flashing materials in a shingle-style sequence so water is directed outward. Form a sill pan or equivalent sill protection when required by the project details. 30–60 minutes Follow the flashing system instructions; keep drainage paths open and avoid creating a pocket that traps water.
5 Dry-fit and position the window Place the window in the opening and confirm its orientation and intended setback. Use appropriate support blocks or shims at the locations specified for the window type. 15–30 minutes Check that the frame is centered as intended and that the recessed reveal will be even on all sides.
6 Level, plumb, and square the frame Adjust the frame with shims, checking the sill for level, the jambs for plumb, and the frame for square. Operate the sash or panels during adjustment. 20–40 minutes The window should open, close, and lock smoothly. Avoid overtightening fasteners, which can distort the frame.
7 Fasten the window Secure the frame through the designated fastening points using suitable fasteners for the substrate. Follow the product instructions for fastening locations and spacing. 20–45 minutes Fasteners must engage sound framing or the specified substrate. Recheck operation and alignment after fastening.
8 Complete exterior water management Integrate the window’s nailing fin, mounting flange, or frame with the wall’s weather-resistive barrier and flashing details, as applicable. Use compatible sealants only where the design calls for them. 30–60 minutes Do not seal over weep holes or other drainage openings. The exterior detail should shed water to the outside.
9 Insulate and air-seal the perimeter Fill the gap between the frame and rough opening with an appropriate insulation or air-sealing material. Apply it carefully so it does not bow or compress the window frame. 20–45 minutes Maintain the specified clearance and keep the frame straight. Interior air sealing and exterior water management serve different purposes.
10 Finish the recessed reveal Install interior returns, trim, or reveal finishes after the installation has been checked. Keep finish materials clear of moving parts and drainage features. 1–3 hours Check reveal depth and consistency, protect the frame from finish materials, and leave required service or drainage access clear.
11 Inspect and test Operate the window through its full range, inspect the perimeter seals and flashing transitions, and clean the glass and frame according to the care instructions. 15–30 minutes Confirm smooth operation, secure hardware, clear drainage openings, and no visible gaps or damage. Arrange any required inspection or water testing.

*Typical time estimates are for one standard window under straightforward site conditions and exclude major structural work, difficult access, curing time, and interior or exterior finish work beyond the listed tasks. Actual procedures depend on the wall assembly, window design, local requirements, and manufacturer instructions.

Checking Installation Quality and Planning Maintenance

After a recessed window is installed, check more than its appearance. The frame should sit evenly, with consistent gaps and no visible twist. Open and close each sash several times. It should move smoothly and lock without force. Look closely at the sill, corners, and trim for cracks, loose fasteners, or gaps where water could enter.

Tips: Use a small level to check the frame. Test the locks. After rain, inspect the sill and nearby wall for damp marks. A neat bead of sealant may look reassuring, but it cannot fix poor drainage or a badly aligned frame.

Plan simple checks twice a year, and again after severe weather. Remove dust from tracks with a soft brush, then clear drainage openings so water can escape. Use a damp cloth on accessible surfaces; avoid harsh cleaners that may damage finishes or seals. Watch for condensation that returns often, peeling paint, or musty smells. These signs do not prove a leak, but they deserve attention. Keep notes and photos, since small changes are easier to compare over time. If the frame shifts or water repeatedly appears, ask a qualified installer to inspect the cause before adding more sealant. Be patient. Some problems are less obvious than they first seem.

China Top Guide to Recessed Window Installation for Buyers — Checking Installation Quality and Planning Maintenance

Suggested interval for routine visual checks of common recessed-window components

Check drainage openings and visible frame or glass damage every 6 months. Inspect sealant, hardware, and interior signs of moisture at least once a year. These are general planning intervals, not code requirements; inspect more often after severe weather and follow local guidance and product instructions.

FAQS

What should I decide before choosing a recessed window?

Decide the reveal depth and installation detail first. A deep recess can shade the glass and create an interior ledge, but it may reduce daylight and complicate flashing.

How should I measure the rough opening?

Measure width at the top, center, and bottom, then use the narrowest figure as a reference. Check height at several points and compare the opening’s diagonals. Recheck it.

Why does wall depth matter?

Measure from the interior surface to the exterior finish. This shows how the frame may sit in the wall and how much reveal will remain.

Which frame material should I choose?

Vinyl usually needs little painting, while fiberglass is dimensionally stable. Wood offers a warm interior finish but needs regular care. Aluminum is strong; check its thermal break.

What performance information should I request?

Ask for rated U-factor and solar heat gain coefficient data. Compare matching window sizes and glazing options. A low rating alone does not guarantee a good result.

What should I inspect before installation?

Look for soft timber, loose masonry, uneven plaster, and water marks around the opening. Past moisture damage may remain hidden. Remove trim carefully.

Why dry-fit the window before sealing?

A dry fit can reveal clearance problems before sealant is applied. Support the unit, then use shims to make the frame level, square, and plumb.

How can I check the finished installation?

Recheck alignment after fastening and open and close the sash several times. It should not stick. Inspect the sill and flashing; small gaps are easy to miss behind trim.

Conclusion

This guide introduces recessed windows and explains how their set-back position can enhance a building’s appearance, provide shade, and create a sheltered transition between indoors and outdoors. It outlines common window styles and material options, helping buyers compare performance, durability, maintenance needs, and suitability for local conditions. It also highlights how to assess suppliers by reviewing product details, workmanship, and support before making a purchase.

Successful Recessed window installation begins with accurate measurements of the opening and careful preparation of the surrounding wall. The guide then walks through the main installation stages, including positioning and securing the frame, sealing gaps, and checking that the window operates correctly. Finally, it covers quality checks for alignment, stability, drainage, and airtightness, along with practical maintenance planning to help preserve performance over time.

Ethan

Ethan

Ethan is a professional marketing specialist dedicated to helping businesses better understand innovative products, practical solutions, and evolving market opportunities. With a strong background in product communication, customer research, and content strategy, he transforms complex information......