

Walker Windows Knowledge Base

Blog & Industry Insights

Technical installation guides, pre-construction best practices, and commercial window news.

0%

Choosing the right window flashing and weatherization products is a small decision with large consequences. A narrow tape roll, poorly sized sill pan, or incompatible sealant can redirect water into framing. The damage may remain hidden behind drywall for months. Window flashing and weatherization should therefore be treated as a connected drainage system, not a collection of separate products.

The U.S. Department of Energy reports that windows can account for about 25% to 30% of residential heating and cooling energy use. That figure makes air sealing and installation quality more than cosmetic concerns. ENERGY STAR guidance also emphasizes proper installation, especially around rough openings and perimeter gaps. Product selection should match the wall assembly, climate, window material, and exposure level. In a rain-heavy region, a self-adhered flashing membrane may need stronger adhesion and better low-temperature performance. In a dry climate, UV resistance and sealant compatibility still matter.

Professional references help reduce guesswork. ASTM E2112 provides recognized installation practices for windows, doors, and skylights. FGIA guidance, including AAMA 711 and AAMA 712, addresses self-adhered and liquid-applied flashing materials. Read the technical data sheet, not only the product label. Check substrate preparation, curing temperature, drainage direction, and manufacturer-approved accessories. A product can be excellent and still fail when installed over dusty sheathing.

The practical answer is rarely the cheapest roll. It is the system that remains continuous around the opening. Small details matter. I would also challenge one common assumption: more sealant does not always mean better protection. Thoughtful sequencing, verified compatibility, and careful inspection usually matter more.
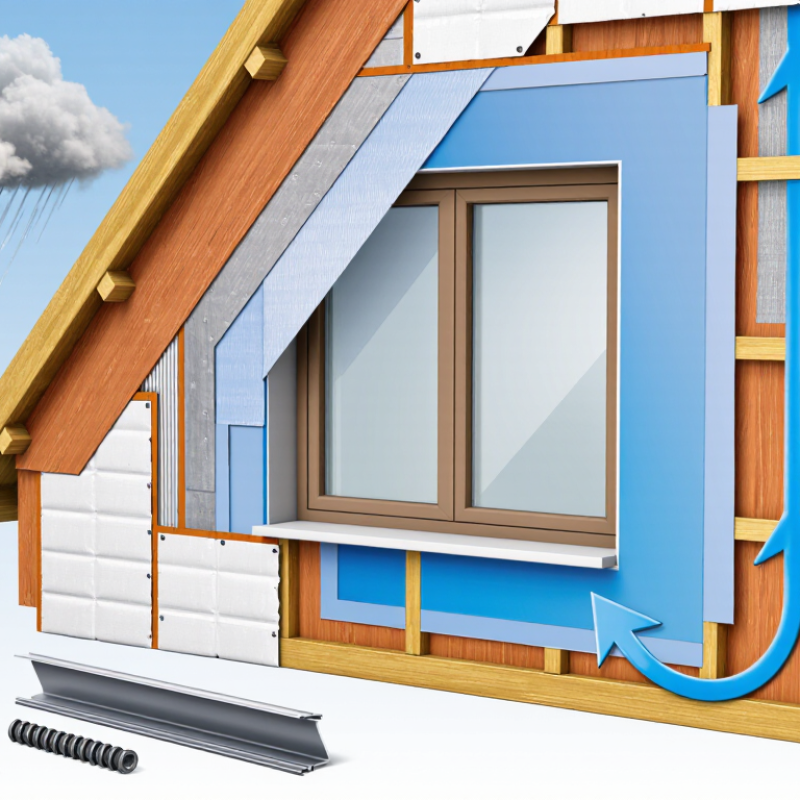
How to Choose Window Flashing and Weatherization Products

Understanding Window Flashing and Weatherization Functions

Window flashing and weatherization products perform different but connected jobs. Flashing directs rainwater away from the window opening and prevents water from entering wall cavities. A sill pan is especially important because it catches hidden leaks beneath the frame. Head flashing protects the upper joint, while side flashing supports drainage along the jambs.

Weatherization focuses on air, heat, and moisture control. Low-expansion foam can seal gaps around the frame, but too much foam may bow the jamb. Backer rod and exterior sealant help manage movement at the perimeter joint. Interior air sealing reduces drafts, while insulation improves comfort near the window. These products should work with the wall’s weather-resistive barrier, not block its drainage path. Small installation errors matter. A beautiful window can still fail.

Tips: Check the sill before installing the window. Use sloped support where needed. Overlap flashing layers like roof shingles, directing water outward. Keep weep paths open. Do not depend on sealant alone. During inspection, look for damp sheathing, stained trim, soft drywall, or cold air near corners. One detail I still reconsider is foam placement; filling every visible gap is not always better. Follow the window instructions and local building requirements, then test the assembly with controlled water exposure.

Assessing Climate, Wall Design, and Window Installation Conditions

Choosing window flashing and weatherization products begins with the site, not the product shelf. The U.S. Department of Energy estimates that windows account for 25–30% of residential heating and cooling energy use. Climate therefore matters.

Cold regions In cold regions, prioritize drainage, airtight interior seals, and condensation control.

Hot, humid regions In hot, humid regions, manage solar heat and outward moisture movement.

Wind-driven rain Wind-driven rain requires stronger detailing than ordinary rainfall.

Wall design changes the installation sequence. A brick veneer wall, fiber-cement cladding, and a drained stucco assembly do not shed water in the same way. FEMA’s P-499 building-science guidance emphasizes continuous flashing, drainage paths, and properly integrated water-resistive barriers.

Products should match the wall’s plane and drainage strategy. A sill pan may help, but only when end dams and side transitions are correctly sealed. Small gaps can become large problems.

Tips:

Inspect the opening before choosing materials. Record the wall type, sill slope, exposure, and existing barrier. Follow ASTM E2112 installation principles and the window manufacturer’s tested details. Do not rely on sealant alone. It ages, moves, and sometimes fails sooner than expected.

A useful field habit is taking photos before covering each flashing layer. I have seen excellent materials perform poorly because the sequence was misunderstood.

Drawings look clean; real openings rarely do. Recheck corners, fastener penetrations, and the lowest drainage point before cladding begins.

Comparing Flashing Materials, Sealants, Tapes, and Membranes

Choosing window weatherization products starts with understanding each material’s job. Metal flashing provides durable protection at heads, sills, and corners. Aluminum is light and easy to form, while galvanized steel offers greater stiffness but needs protection from corrosion. Flexible flashing membranes handle irregular openings and movement better. They also demand clean, dry surfaces.

Sealants close narrow joints around frames and transitions. Choose a product compatible with the window frame, wall membrane, and flashing. Some sealants remain flexible, while others become too rigid for moving joints. Tapes can create fast bonds around corners and fasteners. Acrylic tapes often perform well across changing temperatures, but butyl products may need warmer conditions for reliable adhesion. Press the tape firmly. A loose edge can become a hidden leak path.

Membranes manage water across larger areas. Self-adhered membranes suit many sill and jamb details, while liquid-applied membranes can cover complex shapes. Install them in a shingle-like sequence, so upper layers overlap lower layers and shed water outward. I once saw a careful installation fail because dust remained beneath the sill tape. The product was sound; the preparation was not. That mistake changed my inspection routine. I now check surface dryness, corner coverage, fastener placement, and compatibility before closing the wall. Product instructions and local building requirements still matter, especially where climate and wall design differ.

How to Choose Window Flashing and Weatherization Products

Typical performance comparison of commonly used flashing materials, sealants, tapes, and membranes. Ratings use a 1–5 scale, where 5 indicates stronger typical performance for the listed property.

Metal flashings generally provide durable water-shedding and UV performance, while self-adhered membranes and flashing tapes are better at conforming to irregular surfaces. Sealants accommodate joint movement but depend heavily on proper surface preparation and compatible substrates. Product selection should follow the window manufacturer’s details, local climate, and applicable building codes.

Matching Products to Water, Air, and Vapor Control Requirements

How to Choose Window Flashing and Weatherization Products

When selecting window flashing, match the product to the wall’s water, air, and vapor control needs. Each layer has a different job. Water needs a drainage path, not just a strong adhesive. Sloped sill pans, end dams, and properly lapped membranes help guide leaks toward the exterior. In my field experience, small gaps at corners cause more trouble than large, visible defects. The product must also suit the substrate, temperature, and expected movement.

Air control requires continuity around the entire window opening. A flashing tape may stop rain but still allow drafts through uneven joints. Use compatible sealants, backer materials, or liquid-applied barriers where the design requires them. Press membranes firmly around fasteners and transitions. Do not stretch them excessively. That mistake can create tension and future gaps.

Vapor control differs. It depends on climate and wall assembly. A highly resistant layer may reduce inward drying in some buildings. In colder regions, vapor control often belongs toward the warm side of the insulation, but local requirements must guide the decision. Review technical data sheets, test reports, and installation instructions before combining products. I have seen careful crews choose excellent materials that were incompatible together. The detail looked correct. The assembly was not. A small mock-up can reveal adhesion problems, trapped moisture, or awkward sequencing before installation spreads across the project.

Verifying Compatibility, Durability, and Installation Standards

Choosing window flashing starts with compatibility, not color or price. I check the substrate, frame material, drainage design, and exposure before opening a roll. A membrane that bonds to wood may fail on dusty masonry. Some sealants can also soften foam or stain flexible flashing. Test a small hidden area. It takes minutes. Ask for technical data, temperature limits, primer requirements, and approved joint widths. If those details are missing, pause.

Durability depends on movement as much as weather. I look for resistance to rain, ultraviolet light, freezing, and repeated expansion. At a coastal opening, salt air can expose weak edges quickly. On a shaded wall, trapped moisture may become the greater problem. Flashing should shed water outward, with laps arranged like roof shingles. Press the surface firmly, especially around corners and fasteners. I once trusted a neat-looking seam that had poor adhesion beneath it. It passed a quick visual check, yet failed after heavy rain. That mistake still shapes my inspections.

Installation must follow the product instructions and applicable building standards. Confirm rough-opening dimensions, sill slope, back-dam details, fastener spacing, and integration with the water-resistive barrier. Keep drainage paths open. Do not seal every lower edge by habit. Some systems require a specific gap for water escape. Record lot numbers, temperatures, surface conditions, and photographs before covering the work. A qualified installer should verify critical transitions, especially where roof, wall, and window planes meet. Standards guide the work, but field judgment matters too. I still recheck corners; they are small, but often where failures begin.

How to Choose Window Flashing and Weatherization Products - Verifying Compatibility, Durability, and Installation Standards
Product Type Typical Application Substrate Compatibility Durability and Performance Considerations Relevant Installation or Test Standards Installation Requirements Verification Checklist
Self-Adhered Flashing Membrane Window sill, jamb, and head flashing; rough-opening pan and corner protection. Commonly compatible with wood, plywood, OSB, concrete, masonry, metal, and many WRB surfaces when the substrate is clean, dry, sound, and properly primed if required. Strong resistance to wind-driven rain when fully bonded. Butyl and acrylic adhesive systems generally tolerate a wider range of temperatures than some asphalt-based systems. Confirm UV exposure limits before leaving uncovered. ASTM E2112 for window installation practices; AAMA 711 for self-adhered flashing used around fenestration; ASTM E331 or ASTM E547 for water-penetration testing where specified. Install in shingle fashion, maintain end laps and side laps required by the product instructions, press firmly to remove voids, and integrate with the WRB and sill-pan drainage path. Check adhesion to the actual WRB and sheathing, approved primer requirements, minimum application temperature, maximum uncovered exposure, and sealant compatibility.
Liquid-Applied Flashing Irregular openings, transition areas, corners, penetrations, and surfaces where sheet flashing is difficult to detail. Often suitable for wood, OSB, plywood, concrete, masonry, and some metals. Compatibility can vary significantly with foam insulation, sealants, coatings, and plastics. Forms a continuous membrane with fewer laps. Performance depends on correct wet-film thickness, curing conditions, substrate moisture, and protection from damage during installation. ASTM E2112 for installation sequencing; ASTM E2357 or project-specific air-barrier testing when used as part of an air-control layer; ASTM E331 or ASTM E1105 for water testing when specified. Apply at the specified thickness, bridge cracks and joints as directed, allow adequate cure time, and protect the membrane from puncture or contamination before window installation. Verify coverage rate, cured thickness, temperature and humidity limits, recoat window, compatibility with adjacent materials, and required reinforcing at corners and joints.
Flexible Sill Pan Continuous sill drainage beneath windows to collect incidental water and direct it toward the exterior. Available for wood, masonry, metal, and membrane-integrated installations. The pan must be compatible with the window frame, sealants, adhesives, and WRB. Improves drainage reliability by reducing dependence on sealant alone. End dams and back dams should remain intact and properly supported. ASTM E2112 for sill-pan and flashing integration; ASTM E331 or ASTM E1105 for project water-penetration verification. Provide positive drainage to the exterior, avoid reverse laps, maintain the required back dam, and do not block weep paths or window drainage channels. Confirm pan dimensions, corner treatment, end-dam height, slope or drainage configuration, and connection to jamb and head flashing.
Rigid or Formed Sill Pan High-control sill drainage for new construction, replacement windows, and openings requiring a defined pan geometry. Commonly manufactured from corrosion-resistant metal, molded plastic, or composite materials. Verify dimensional fit and chemical compatibility with sealants and membranes. Provides consistent geometry and durable drainage. Rigid pans require accurate sizing and may need movement accommodation at joints or ends. ASTM E2112 for installation detailing; ASTM E331 or ASTM E1105 for water testing; applicable building-code requirements for flashing and drainage. Install level or with the specified drainage slope, seal or gasket end conditions as designed, maintain clearance for the window, and connect the pan to the surrounding WRB. Inspect for cracks, sharp edges, blocked weeps, inadequate end dams, improper fastener placement, and gaps between the pan and frame.
Flashing Tape for Nailing Flanges Sealing and weatherproofing over window and door nailing flanges after the unit is positioned and fastened. Typically used on wood-based sheathing and compatible WRBs. Some tapes require primer or are unsuitable for damp, dusty, low-energy, or highly textured surfaces. Provides a secondary water-shedding layer. Long-term adhesion is affected by surface preparation, rolling pressure, temperature, and exposure to sunlight. AAMA 711 where the product is classified for fenestration flashing; ASTM E2112 for installation sequence; ASTM E331 or ASTM E1105 for water testing. Apply without fish-mouths or wrinkles, use a roller for full contact, maintain required overlap, and install head flashing or a drip-cap detail where required. Check substrate cleanliness, adhesion, lap direction, minimum tape width, fastener coverage, UV exposure limit, and integration with the WRB above the opening.
Flashing-Compatible Sealant Sealing joints at window frames, end dams, transitions, fasteners, and interfaces between dissimilar materials. Compatibility depends on the chemistry of the sealant and the adjoining surfaces. Verify suitability for vinyl, painted metal, anodized aluminum, wood, masonry, membranes, and plastics. Look for resistance to water, temperature cycling, movement, and aging. Sealant selection must account for joint movement and adhesion on both sides of the joint. ASTM C920 for elastomeric joint sealants; ASTM C794 or ASTM C1521 may be used for adhesion evaluation when required by the project. Use properly prepared and dry surfaces, install the correct backer material where applicable, maintain the designed joint width-to-depth ratio, and tool the sealant without trapping air. Confirm sealant chemistry, cure conditions, movement class, primer requirement, compatibility with flashing adhesives, and manufacturer-approved adhesion testing procedures.
Weather-Resistive Barrier Integration Material Connecting window flashing to the wall’s water-resistive barrier and creating a continuous drainage plane. Must be compatible with the specific WRB, flashing membrane, tapes, sealants, cladding attachments, and sheathing materials used on the project. Continuity is more important than using a single product type. Openings should shed water outward and must not create reverse laps or trapped water pockets. ASTM E2556 for vapor-permeable flexible sheet WRBs where applicable; ASTM E2112 for fenestration integration; ASTM E2357 for air-barrier assembly testing where specified. Install the WRB in shingle-lapped layers, temporarily or permanently secure upper flaps, integrate head flashing, and preserve drainage behind the cladding. Verify lap direction, membrane continuity, penetration treatment, drainage openings, transition details, and compatibility with the selected window flashing system.
Backer Rod and Joint Filler Controlling sealant depth and preventing three-sided adhesion at perimeter joints and transition gaps. Closed-cell, open-cell, or bi-cellular materials may be used depending on joint design, moisture exposure, and sealant requirements. Confirm chemical compatibility. Supports a properly shaped sealant joint and reduces sealant consumption. Incorrect sizing can cause displacement, stress, or inadequate sealant depth. ASTM C920 for the sealant system; ASTM C1193 for guide-based sealant joint design and installation practices. Select a rod approximately 25% larger than the joint width unless project instructions state otherwise, install without puncturing it, and avoid damaging adjacent membranes. Check joint width, sealant depth, compression, bond-breaker function, moisture condition, and whether the filler is compatible with the sealant chemistry.
Low-Expansion Window and Door Foam Air sealing and insulating the perimeter gap between the window frame and rough opening. Use only formulations designated for windows and doors. Verify compatibility with vinyl, wood, metal, membranes, sealants, and flexible flashing materials. Reduces air leakage and heat transfer but is not a substitute for exterior flashing or a drainage plane. Excessive expansion can distort the frame. ASTM C1642 for spray-applied polyurethane foam used in fenestration perimeter applications; ASTM E283 for air-leakage testing of installed fenestration where specified. Follow the gap-size and moisture requirements, apply in controlled lifts when required, keep weep paths clear, and allow curing before trimming or applying interior finishes. Confirm low-expansion classification, fire and smoke requirements, curing time, frame-bracing needs, and compatibility with the window manufacturer’s installation instructions.
Exterior Backer Seal or Recessed Seal Detail Providing a controlled exterior seal at the window-to-wall interface while allowing designed drainage and movement. Suitable materials depend on the window frame, exterior cladding, WRB, flashing, and joint geometry. Avoid bonding materials that require independent movement. Durability depends on correct joint design, adhesion, backing, exposure, and maintenance. A seal should not unintentionally block designed drainage paths. ASTM C1193 for sealant joint design; ASTM C920 for qualifying elastomeric sealants; ASTM E2112 for fenestration installation practices. Prepare surfaces, use primer where required, maintain a continuous and properly tooled bead, and coordinate the seal with the sill pan, jamb flashing, and head flashing. Inspect continuity, adhesion, joint dimensions, sealant tooling, drainage openings, movement allowance, and separation from incompatible materials.
Selection note: Product performance and installation limits vary by formulation and project conditions. Always verify the current technical data sheet, safety information, tested assembly, exposure limits, substrate requirements, and applicable local building-code provisions before installation. ASTM and AAMA references identify commonly used evaluation or installation standards; project specifications may require additional testing.

FAQS

What is the main purpose of window flashing?

Flashing directs rainwater away from the opening and wall cavities. It should guide water outward, not trap it behind cladding.

Why is a sill pan important?

A sill pan catches leaks hidden beneath the window frame. Use sloped support and sealed end dams when needed. Small gaps matter.

How do head and side flashing work?

Head flashing protects the upper joint from wind-driven rain. Side flashing supports drainage along the jambs. Overlap layers like roof shingles.

What does weatherization control around a window?

Weatherization manages air, heat, and moisture movement. Interior air sealing reduces drafts, while insulation improves comfort near cold surfaces.

Can expanding foam seal every gap?

No. Low-expansion foam can seal frame gaps, but excessive foam may bow the jamb. I still question this detail; more foam is not always better.

Should sealant handle the entire waterproofing job?

No. Backer rod and exterior sealant help manage movement at perimeter joints. Sealant ages and moves, so drainage layers must do real work.

How does climate affect window installation?

Cold regions need drainage, airtight seals, and condensation control. Hot, humid regions need solar-heat management and outward moisture movement. Wind-driven rain needs stronger details.

How should wall design affect installation?

Brick veneer, fiber-cement cladding, and drained stucco shed water differently. Match flashing to the wall plane and drainage strategy. Details vary.

What should inspectors check before covering the assembly?

Look for damp sheathing, stained trim, soft drywall, and cold air near corners. Keep weep paths open. Photograph each flashing layer before cladding.

How can the completed window assembly be tested?

Use controlled water exposure after installation. Recheck corners, fastener penetrations, and the lowest drainage point. Drawings look clean; real openings rarely do.

Conclusion

Choosing the right window flashing and weatherization products begins with understanding how each component manages water, air, and vapor around the window opening. Window flashing and weatherization systems may include sill pans, tapes, membranes, sealants, and protective barriers, but their suitability depends on the local climate, wall assembly, exposure level, and installation conditions. Cold, wet, windy, or humid environments may require different strategies than dry or temperate regions.

A reliable selection process compares material durability, flexibility, adhesion, drainage performance, and resistance to temperature changes or ultraviolet exposure. Products should work together without creating compatibility problems between substrates, sealants, coatings, and window frames. It is also essential to confirm that the installation approach supports proper sequencing, drainage paths, air sealing, and vapor control. Following recognized construction standards and manufacturer-independent project specifications can help reduce leaks, condensation, drafts, and premature deterioration while improving the long-term performance of the entire wall system.

Oliver

Oliver

Oliver is a dedicated marketing professional who combines strategic insight, industry knowledge, and a strong understanding of customer needs. As a key contributor to our company, he is highly familiar with our products, services, and the practical value they provide to businesses and everyday......